Shrinking a partition by using the GUI : Shrinking a Partition in Windows Vista/2008 - Part II
This is a complete visual guide to how to re-partition or shrink the Hard disk drive in Windows Vista.
Follow these steps, ensure your notebook's on AC supply, BE COOL. Click the screenshots below to enlarge them (open in new window), save the screenshots of Shrinking partition if you want, then you're on the track. All the Best!
It took us just few minutes if not seconds if you’re going for few gigs, but in our case it’s more than 100 gigs though it took us only about 72 seconds.
However, it took about a 3-quarter hour to format the shrinked new partition of 117GB in NTFS.
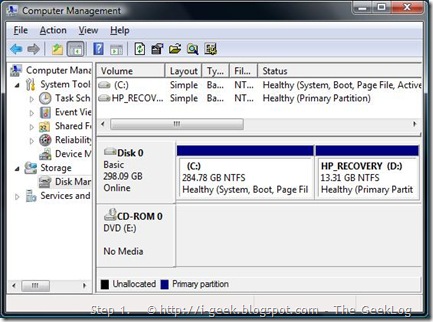
Step 1.
- Ensure you have Administrative credentials, In Windows Vista, go to Control Panel > System and Maintenance > Administrative Tools, or on the My Computer context menu. Select Computer Management. In Vista, if you are prompted for an administrator password or confirmation, type the password or provide confirmation.
- In Windows Server 2008 you need to go to Server Manager, found in the Administrative Tools folder or on the My Computer context menu.
- Next, scroll down till you get to the Storage section, and in it go to the Disk Management console.
- Select the disk you want to shrink, for example Drive C, as in our case.
Note: Shrinking any volume is fine as long as you make sure you leave enough space on the partition you are shrinking. For example, having a 40 GB system partition might seem too much at the beginning, but after a while you might find it to be less than optimal. You see, many applications such as Microsoft Office take tons of free space. So do Service Packs, hotfixes and other files. For a server running Windows Server 2008 this calculation might be different than on a workstation running Windows Vista, but in any case, make a mental note of this BEFORE shrinking your partitions.
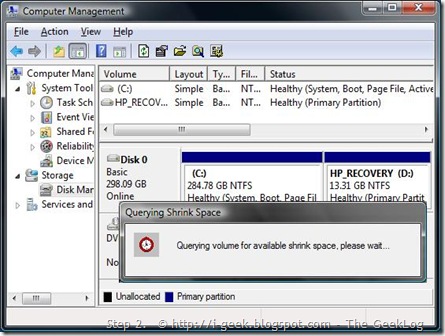
Step 2.
Quering volume for available shrink space, right click to query the partition it's C: in here.
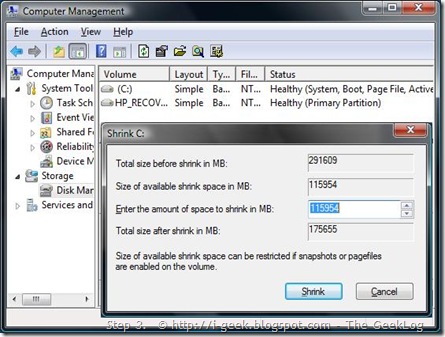
Step 3.
Disk Management showing the wizard to enter the amount of space to shrink in MB. Size of available shrink space can be restricted if snapshots or pagefiles are enabled on the volume.
Click Shrink to use the maximum allowable amount of space.
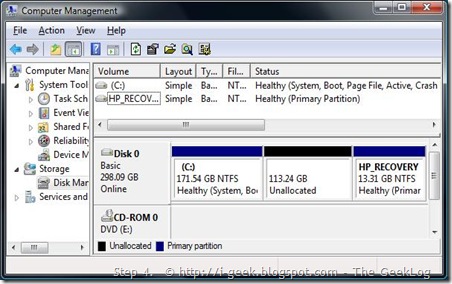
Step 4.
After clicking the Shrink button, a new unallocated space is visible, it's 113.24 GB in here.
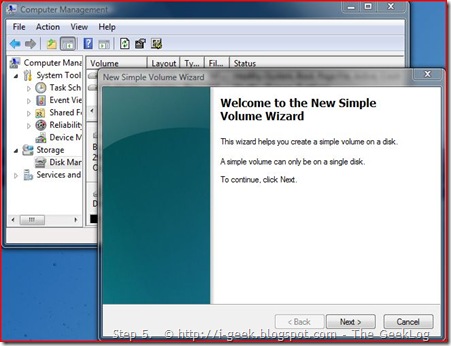
Step 5.
Now you might want to format the newly created partition on your Windows Vista. Creating a new volume in the space available after shrinking. The wizard helps you create a simple volume on a disk.
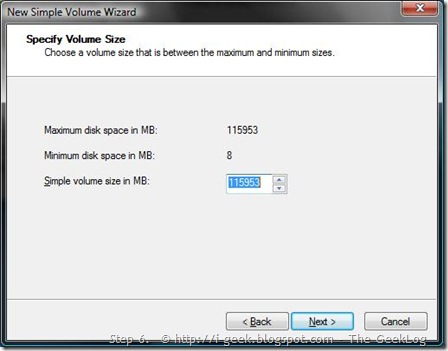
Step 6.
Specifying the Volume Size to create a new partition.
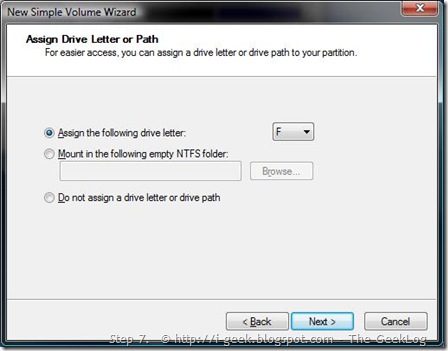
Step 7.
Assign the drive letter
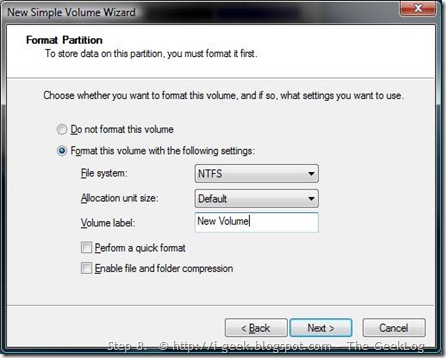
Step 8.
Partition format wizard: format as per your need of the file system NTFS or FAT, and assign a new name or volume label to it.
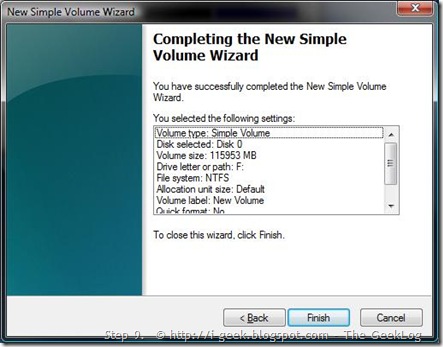
Step 9.
Click Finish to process formatting.
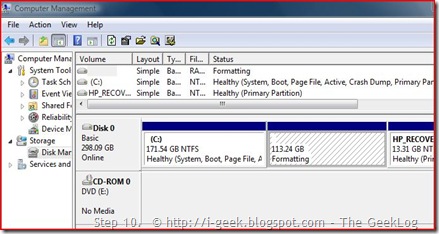
Step 10.
Formatting..
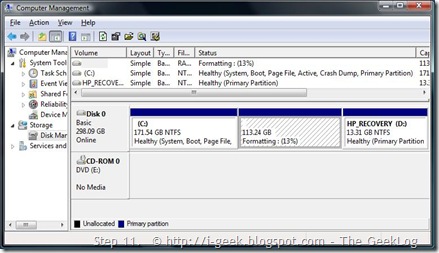
Step 11.
Formatting the new partition (result of shrinking), formatting is your Choice in NTFS (recommended) or FAT32.
Finally, You will have successfully created a new partition out of the freed space.
Hope this will solve your queries. Since the screenshots are real time capture @ our workshop, they are self-explanatory and will assist you a lot.
Please, read the volume III edition of this article : Shrinking a partition by using the CommandLine : Shrinking a Partition in Windows Vista/2008 - Part III
Read Volume I of this article: Shrinking a Partition in Windows Vista/2008 I : Read before you Act



0 responses:
Post a Comment
Thanking you for your comment(s). Hope you will visit this blog again!