Managing Junk E-mail in Windows Mail
Windows Mail is the inbuilt-default email client that comes with Windows Vista. You can opt for Windows Live Mail if you are on Windows XP. One of the most notable features of Windows Mail is Junk E-mail management.
 Windows Mail helps to manage Inbox free of unwanted e-mails and phishing, junk mails. This facility was still in juvenile stage in Windows XP’s built in mail client – Outlook Express.
Block spam and other unwanted e-mails using Windows (Live) Mail:
- The junk e‑mail filter is designed to catch obvious unsolicited commercial e‑mail messages (often called "spam") and move them to a special Junk e‑mail folder. You can increase or decrease the junk e‑mail protection level based on how much junk e‑mail you receive.
- You can move e‑mail messages from the Junk e‑mail folder back to your Inbox.
- You can block messages from specific e‑mail addresses by adding them to the Blocked Senders list.
- You can prevent the blocking of messages from specific e‑mail addresses by adding them to the Safe Senders list.
How to change the junk e-mail protection level?
- Click to open Windows Mail.
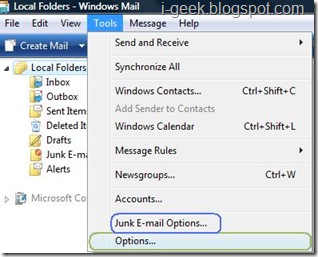
- Click the Tools menu, and then click Junk e‑mail Options.
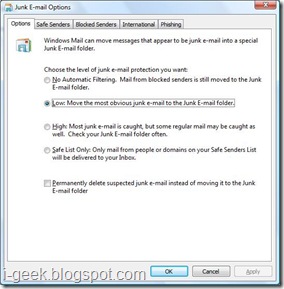
- Select the protection level you want:
- No Automatic Filtering. Click this option if you want to stop blocking junk e‑mail messages altogether. However, Windows Mail will continue to block messages from domain names and e‑mail addresses on your Blocked Senders list.
- Low. Click this option if you don't receive many junk e‑mail messages and want to block only the most obvious junk e‑mail messages.
- High. Click this option if you receive a large volume of junk e‑mail messages and want to block as many as possible. However, you should periodically review the messages in your Junk e‑mail folder to ensure that there are not any legitimate e‑mail messages that might have been moved there as well.
- Safe List Only. Click this option if you only want to receive messages from people or domain names on your Safe Senders list. E‑mail messages from people or domain names not on your Safe Senders list will be treated as junk e‑mail messages, so you should only choose this option if you are certain that every person or domain name you want to receive messages from is on your Safe Senders list.
 Move a message from the Junk e‑mail folder to your Inbox
- Click to open Windows Mail.
- Click the Junk e‑mail folder.
- Click the message that you want to move to your Inbox.
- Click the Message menu, point to Junk e‑mail, and then click Mark as Not Junk. The message is moved to your Inbox.
Note: Though marking a message as not junk will move that message to your Inbox, future messages from that sender might still end up in the Junk e‑mail folder. To prevent this from happening, add the sender to the Safe Senders list.
Add a sender to the Blocked Senders list
When a message is received from an e‑mail address that's on the Blocked Senders list, it is automatically moved to the Junk e‑mail folder. The only exception is if the address is also on the Safe Senders list, in which case the message won't be filed as junk because the Safe Senders list has priority over the Blocked Senders list.
- Click to open Windows Mail.
- Click a message from the sender that you want to add to the Blocked Senders list.
- Click the Message menu, point to Junk e‑mail, and then do one of the following:
- To block all future messages from that specific sender, click Add Sender to Blocked Senders List.
- To block all messages from any sender whose domain name (the portion of the e‑mail address after the @) is the same as the sender's, click Add Sender's Domain (@example.com) to Blocked Senders List.
Note
- If you want to add a sender to the Blocked Senders list and you don't have a message from that sender available, you can add the sender's address manually. To do this, click the Message menu, point to Junk e‑mail, and then click Junk e‑mail Options. Click the Blocked Senders tab, click Add, type the e‑mail address you'd like to block, and then click OK.
Add a sender to the Safe Senders list
When a message is received from an e‑mail address that's on the Safe Senders list, it won't be moved to the Junk e‑mail folder.
- Click to open Windows Mail.
- Click a message from the sender that you want to add to the Safe Senders list.
- Click the Message menu, point to Junk e‑mail, and then do one of the following:
- To allow all future messages from that specific sender, click Add Sender to Safe Senders List.
- To allow all messages from any sender whose domain name is the same as the sender's, click Add Sender's Domain (@example.com) to Safe Senders List.
Note
If you want to add a sender to the Safe Senders list and you don't have a message from that sender available, you can add the sender's address manually. To do this, click the Message menu, point to Junk e‑mail, and then click Junk e‑mail Options. Click the Safe Senders tab, click Add, type the e‑mail address you'd like to allow, and then click OK.
Disclaimer: The text in-here is enhanced from Windows Mail Help and Support. Features might vary on your computer.


0 responses:
Post a Comment
Thanking you for your comment(s). Hope you will visit this blog again!