Tuesday, July 29, 2008

What's new in Microsoft Office Word 2007

Microsoft Office Word 2007 helps you produce professional-looking documents by providing a comprehensive set of tools for creating and formatting your document in a new interface. Rich review, commenting, and comparison capabilities help you quickly gather and manage feedback from colleagues. Advanced data integration ensures that documents stay connected to important sources of business information.

Create professional-looking documents

Office Word 2007 provides editing and reviewing tools for creating polished documents more easily than ever before.

Spend more time writing, less time formatting

A new, results-oriented interface presents tools to you when you need them, in a clear and organized fashion:

  • Save time and get more out of the powerful Word capabilities by selecting from galleries of predefined styles, table formats, list formats, graphical effects, and more.
  • Word eliminates the guesswork when you apply formatting to your document. The galleries of formatting choices give you a live visual preview of the formatting in your document before you commit to making a change.
Add preformatted elements with just a few clicks

Office Word 2007 introduces building blocks for adding preformatted content to your documents:

  • When you are working on a document from a particular template type, such as a report, you can select from a gallery of preformatted cover pages, pull quotes, and headers and footers to make your document look more polished.
  • If you want to customize the preformatted content, or if your organization often uses the same piece of content, such as legal disclaimer text or customer contact information, you can create your own building blocks that you select from the gallery with a single click.
Communicate more effectively with high-impact graphics

New charting and diagramming features include three-dimensional shapes, transparency, drop shadows, and other effects.

Instantly apply a new look and feel to your documents

When your company updates its look, you can instantly follow suit in your documents. By using Quick Styles and Document Themes, you can quickly change the appearance of text, tables, and graphics throughout your document to match your preferred style or color scheme.

Easily avoid spelling errors

The following are some new features of the spelling checker:

  • The spelling checker has been made more consistent across the 2007 Microsoft Office system programs. Examples of this change include:
    • Several spelling checker options are now global. If you change one of these options in one Office program, that option is also changed for all the other Office programs.
    • In addition to sharing the same custom dictionaries, all programs can manage them using the same dialog box.
  • The 2007 Microsoft Office system spelling checker includes the post-reform French dictionary. In Microsoft Office 2003, this was an add-in that had to be separately installed.
  • An exclusion dictionary is automatically created for a language the first time that language is used. Exclusion dictionaries let you force the spelling checker flag words you want to avoid using. They are handy for avoiding words that are obscene or that don't match your style guide.
  • The spelling checker can find and flag some contextual spelling errors. Have you ever typed a mistake similar to the following? I will see you their. In Office Word 2007, you can enable the Use contextual spelling option to get help with finding and fixing this type of mistake. This option is available when checking the spelling of documents in English, German or Spanish.
  • You can disable spelling and grammar checking for a document or for all documents you create.


Share documents confidently

When you send a draft of a document to your colleagues for their input, Office Word 2007 helps you efficiently collect and manage their revisions and comments. When you are ready to publish the document, Office Word 2007 helps you ensure that any unresolved revisions and comments aren't still lurking in the published document.

Quickly compare two versions of a document

Office Word 2007 makes it easy to find out what changes were made to a document. When you compare and combine documents, you can see both versions of the document — with the deleted, inserted, and moved text clearly marked in a third version of the document.

Find and remove hidden metadata and personal information in documents

Before you share your document with other people, you can use the Document Inspector to check the document for hidden metadata, personal information, or content that may be stored in the document. The Document Inspector can find and remove information like comments, versions, tracked changes, ink annotations, document properties, document management server information, hidden text, custom XML data, and information in headers and footers. The Document Inspector can help you ensure that the documents you share with other people do not contain any hidden personal information or any hidden content that your organization might not want distributed. Additionally, your organization can customize the Document Inspector to add checks for additional types of hidden content.

Add a digital signature or signature line to your documents

You can help provide assurance as to the authenticity, integrity, and origin of your document by adding a digital signature to the document. In Office Word 2007 you can either add an invisible digital signature to a document, or you can insert a Microsoft Office Signature Line to capture a visible representation of a signature along with a digital signature.

The ability to capture digital signatures by using signature lines in Office documents makes it possible for organizations to use paperless signing processes for documents like contracts or other agreements. Unlike signatures on paper, digital signatures provide a record of exactly what was signed and they allow the signature to be verified in the future.

Convert your Word documents to PDF or XPS

Office Word 2007 supports exporting your file to the following formats:

  • Portable Document Format (PDF)   PDF is a fixed-layout electronic file format that preserves document formatting and enables file sharing. The PDF format ensures that when the file is viewed online or printed, it retains exactly the format that you intended, and that data in the file cannot be easily changed. The PDF format is also useful for documents that will be reproduced by using commercial printing methods.
  • XML Paper Specification (XPS)   XPS is an electronic file format that preserves document formatting and enables file sharing. The XPS format ensures that when the file is viewed online or printed, it retains exactly the format that you intended, and that data in the file cannot be easily changed.
Instantly detect documents that contain embedded macros

Office Word 2007 uses a separate file format (.docm) for macro-enabled documents, so you can instantly tell whether a file is capable of running any embedded macros.

Prevent changes to a final version of a document

Before you share a final version of a document with other people, you can use the Mark As Final command to make the document read-only and communicate to other people that you are sharing a final version of the document. When a document is marked as final, typing, editing commands, and proofing marks are disabled, and people who view the document cannot inadvertently change the document. The Mark As Final command is not a security feature. Anyone can edit a document that is marked as final by turning off Mark As Final.

Go beyond documents

Now more than ever, when computers and files are interconnected, it pays to store documents in files that are slim, sturdy, and supportive of a wide variety of platforms. To meet this need, the Microsoft Office system achieves a new stage in its evolution of XML support. The new XML-based file format enables Office Word 2007 files to be smaller, more robust, and deeply integrated with information systems and external data sources.

Reduce file sizes and improve corruption recovery

The new Word XML format is a compressed, segmented file format that offers a dramatic reduction in file size and helps ensure that damaged or corrupted files can be easily recovered.

Connect your documents to business information

In your business, you create documents to communicate important business data. You can save time and reduce the risk of error by automating the process of this communication. Create dynamic smart documents that update themselves by using new document controls and data binding to connect to your back-end systems.

Manage document properties in the Document Information Panel

The Document Information Panel makes it easy to view and edit document properties while you work on your Word document. The Document Information Panel displays at the top of your document in Word. You can use the Document Information Panel to view and edit both standard Microsoft Office document properties and properties for files that are saved to a document management server. If you use the Document Information Panel to edit the document properties for a server document, the updated properties will be saved directly to the server.

For example, you may have a server that keeps track of a document's editorial status. When you put the finishing touches on a document, you can open the Document Information Panel to change the document's editorial status from Draft to Final. When you save the document back on the server, the change in editorial status is updated on the server.

If you store document templates in a library on a Microsoft Windows SharePoint Services 3.0 server, the library might include custom properties that store information about the templates. For example, your organization may require you to categorize documents in the library by filling in a Category property. Using the Document Information Panel, you can edit properties like this directly within the Word environment.

Recover from computer problems

2007 Microsoft Office system provides improved tools for recovering your work in the event of a problem in Office Word 2007.

Office Diagnostics

Microsoft Office Diagnostics is a series of diagnostic tests that can help you to discover why your computer is crashing. The diagnostic tests can solve some problems directly and may identify ways that you can solve other problems. Microsoft Office Diagnostics replaces the following Microsoft Office 2003 features: Detect and Repair and Microsoft Office Application Recovery.

Program recovery

Office Word 2007 has improved capabilities to help avoid losing work when the program closes abnormally. Whenever possible, Word tries to recover some aspects of the state of the program after it restarts.

For example, you are working on several files at the same time. Each file is open in a different window with specific data visible in each window. Word crashes. When you restart Word, it opens the files and restores the windows to the way they were before Word crashed.

This article is adapted from the Help and support section of Microsoft Office Suite 2007, also accessible online @ support.microsoft.com and Windows Live Office.

Monday, July 21, 2008

Shrinking a partition by using the command line : Shrinking a Partition in Windows Vista/2008 - Part III

Please, read these two articles on Vista's Partioning before you proceed.

Please, try the simpler way you feel and backup your important data before you proceed.

Shrinking a partition or volume can be done via the CLI, or command line interface. This works in both Vista and Windows Server 2008. In order to do that perform the following steps:

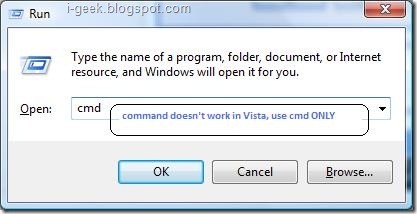
  1. Click Start and type CMD, then press Enter.

run cmd

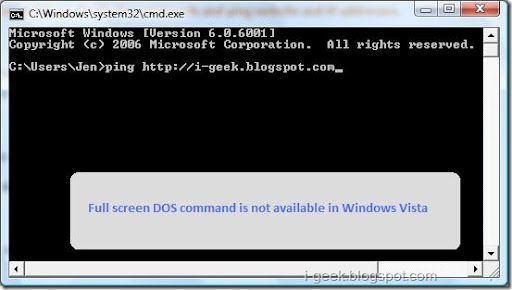
Be aware that full screen DOS mode is not available in Vista.

  1. In the command prompt type

Diskpart

  1. Select the right disk drive and partition to work on. Typically this should be disk 0 and partition 1, but YMMV.

Select disk 0
Select partition 1

Note: You may want to perform a LIST operation to view your existing disks and partitions BEFORE attempting to shrink the wrong one:

List disk
List partition

  1. When the right disk and partitions were selected, perform the SHRINK command. If you don't specify the size to shrink by, then the command will shrink the partition by the maximum allowed size.

Shrink desired=500

The above command will shrink the partition by 500 MB.

Shrink

The above command will shrink the partition by the maximum allowed size.

And with that final step, we have completed our task.

Sunday, July 20, 2008

Managing Junk E-mail in Windows Mail

Windows Mail is the inbuilt-default email client that comes with Windows Vista. You can opt for Windows Live Mail if you are on Windows XP. One of the most notable features of Windows Mail is Junk E-mail management.

Windows Mail Junk E-mail Options1  Windows Mail helps to manage Inbox free of unwanted e-mails and phishing, junk mails. This facility was still in juvenile stage in Windows XP’s built in mail client – Outlook Express.

Block spam and other unwanted e-mails using Windows (Live) Mail:

  • The junk e‑mail filter is designed to catch obvious unsolicited commercial e‑mail messages (often called "spam") and move them to a special Junk e‑mail folder. You can increase or decrease the junk e‑mail protection level based on how much junk e‑mail you receive.
  • You can move e‑mail messages from the Junk e‑mail folder back to your Inbox.
  • You can block messages from specific e‑mail addresses by adding them to the Blocked Senders list.
  • You can prevent the blocking of messages from specific e‑mail addresses by adding them to the Safe Senders list.

How to change the junk e-mail protection level?

  • Click to open Windows Mail.
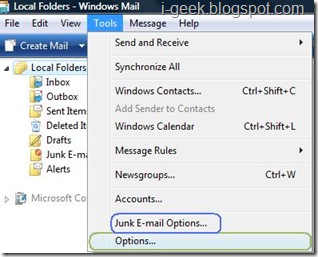
  • Click the Tools menu, and then click Junk e‑mail Options.
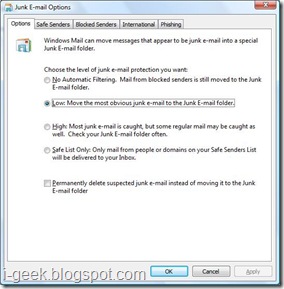
  • Select the protection level you want:
  • No Automatic Filtering. Click this option if you want to stop blocking junk e‑mail messages altogether. However, Windows Mail will continue to block messages from domain names and e‑mail addresses on your Blocked Senders list.
  • Low. Click this option if you don't receive many junk e‑mail messages and want to block only the most obvious junk e‑mail messages.
  • High. Click this option if you receive a large volume of junk e‑mail messages and want to block as many as possible. However, you should periodically review the messages in your Junk e‑mail folder to ensure that there are not any legitimate e‑mail messages that might have been moved there as well.
  • Safe List Only. Click this option if you only want to receive messages from people or domain names on your Safe Senders list. E‑mail messages from people or domain names not on your Safe Senders list will be treated as junk e‑mail messages, so you should only choose this option if you are certain that every person or domain name you want to receive messages from is on your Safe Senders list.

 Windows Mail Junk E-mail Options2Move a message from the Junk e‑mail folder to your Inbox

  1. Click to open Windows Mail.
  2. Click the Junk e‑mail folder.
  3. Click the message that you want to move to your Inbox.
  4. Click the Message menu, point to Junk e‑mail, and then click Mark as Not Junk. The message is moved to your Inbox.

Note: Though marking a message as not junk will move that message to your Inbox, future messages from that sender might still end up in the Junk e‑mail folder. To prevent this from happening, add the sender to the Safe Senders list.

Add a sender to the Blocked Senders list

When a message is received from an e‑mail address that's on the Blocked Senders list, it is automatically moved to the Junk e‑mail folder. The only exception is if the address is also on the Safe Senders list, in which case the message won't be filed as junk because the Safe Senders list has priority over the Blocked Senders list.

  1. Click to open Windows Mail.
  2. Click a message from the sender that you want to add to the Blocked Senders list.
  3. Click the Message menu, point to Junk e‑mail, and then do one of the following:
    • To block all future messages from that specific sender, click Add Sender to Blocked Senders List.
    • To block all messages from any sender whose domain name (the portion of the e‑mail address after the @) is the same as the sender's, click Add Sender's Domain (@example.com) to Blocked Senders List.

Note

    • If you want to add a sender to the Blocked Senders list and you don't have a message from that sender available, you can add the sender's address manually. To do this, click the Message menu, point to Junk e‑mail, and then click Junk e‑mail Options. Click the Blocked Senders tab, click Add, type the e‑mail address you'd like to block, and then click OK.

Add a sender to the Safe Senders list

When a message is received from an e‑mail address that's on the Safe Senders list, it won't be moved to the Junk e‑mail folder.

  1. Click to open Windows Mail.
  2. Click a message from the sender that you want to add to the Safe Senders list.
  3. Click the Message menu, point to Junk e‑mail, and then do one of the following:
    • To allow all future messages from that specific sender, click Add Sender to Safe Senders List.
    • To allow all messages from any sender whose domain name is the same as the sender's, click Add Sender's Domain (@example.com) to Safe Senders List.

Note

If you want to add a sender to the Safe Senders list and you don't have a message from that sender available, you can add the sender's address manually. To do this, click the Message menu, point to Junk e‑mail, and then click Junk e‑mail Options. Click the Safe Senders tab, click Add, type the e‑mail address you'd like to allow, and then click OK. 

Disclaimer: The text in-here is enhanced from Windows Mail Help and Support. Features might vary on your computer.

Shrinking a partition by using the GUI : Shrinking a Partition in Windows Vista/2008 - Part II

Please, read volume I of this article before proceeding since there's a little background of How to handle partitioning and related issued in Windows Vista.

This is a complete visual guide to how to re-partition or shrink the Hard disk drive in Windows Vista.

Follow these steps, ensure your notebook's on AC supply, BE COOL. Click the screenshots below to enlarge them (open in new window), save the screenshots of Shrinking partition if you want, then you're on the track. All the Best!

It took us just few minutes if not seconds if you’re going for few gigs, but in our case it’s more than 100 gigs though it took us only about 72 seconds.

However, it took about a 3-quarter hour to format the shrinked new partition of 117GB in NTFS.

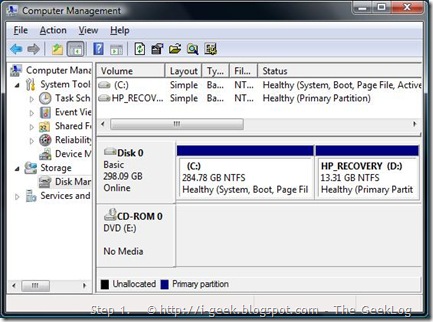
Step 1.

  • Ensure you have Administrative credentials, In Windows Vista, go to Control Panel > System and Maintenance > Administrative Tools, or on the My Computer context menu. Select Computer Management. In Vista, if you are prompted for an administrator password or confirmation, type the password or provide confirmation.
  • In Windows Server 2008 you need to go to Server Manager, found in the Administrative Tools folder or on the My Computer context menu.
  1. Next, scroll down till you get to the Storage section, and in it go to the Disk Management console.
  1. Select the disk you want to shrink, for example Drive C, as in our case.

Note: Shrinking any volume is fine as long as you make sure you leave enough space on the partition you are shrinking. For example, having a 40 GB system partition might seem too much at the beginning, but after a while you might find it to be less than optimal. You see, many applications such as Microsoft Office take tons of free space. So do Service Packs, hotfixes and other files. For a server running Windows Server 2008 this calculation might be different than on a workstation running Windows Vista, but in any case, make a mental note of this BEFORE shrinking your partitions.

vista partition1

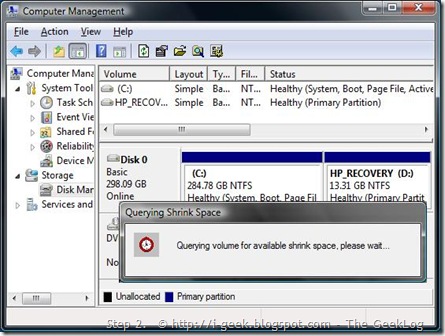
Step 2.

Quering volume for available shrink space, right click to query the partition it's C: in here.

vista partition2

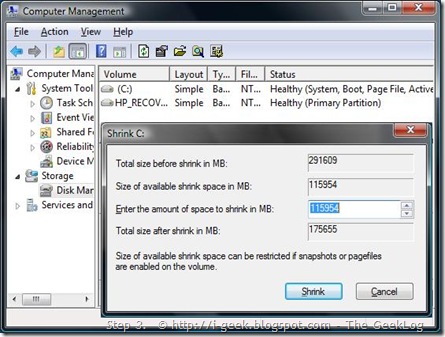
Step 3.

Disk Management showing the wizard to enter the amount of space to shrink in MB. Size of available shrink space can be restricted if snapshots or pagefiles are enabled on the volume.

Click Shrink to use the maximum allowable amount of space.

vista partition3

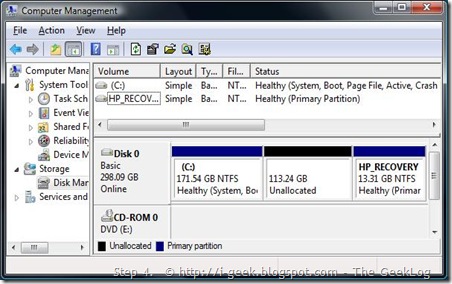
Step 4.

After clicking the Shrink button, a new unallocated space is visible, it's 113.24 GB in here.

vista partition4

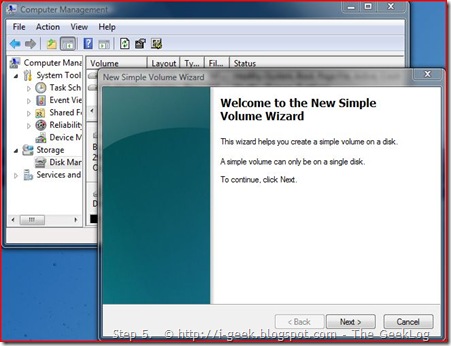
Step 5.

Now you might want to format the newly created partition on your Windows Vista. Creating a new volume in the space available after shrinking. The wizard helps you create a simple volume on  a disk.

vista partition5

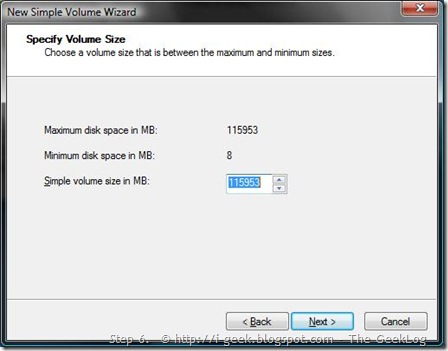
Step 6.

Specifying the Volume Size to create a new partition.

vista partition6

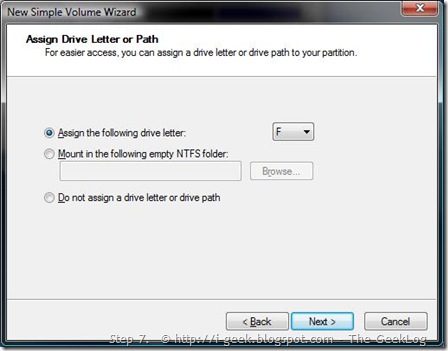
Step 7.

Assign the drive letter

vista partition7

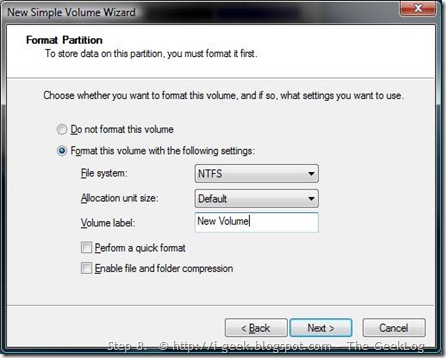
Step 8.

Partition format wizard: format as per your need of the file system NTFS or FAT, and assign a new name or volume label to it.

 vista partition8

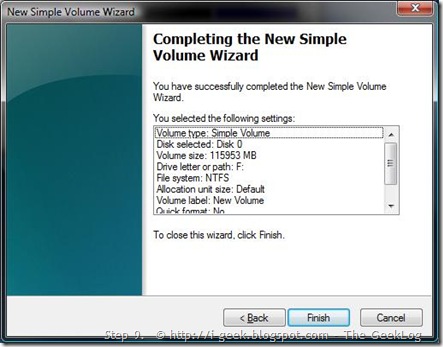
Step 9.

Click Finish to process formatting.

vista partition9 

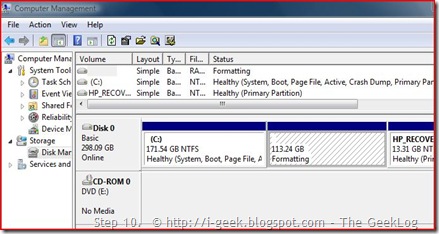
Step 10.

Formatting..

vista partition10

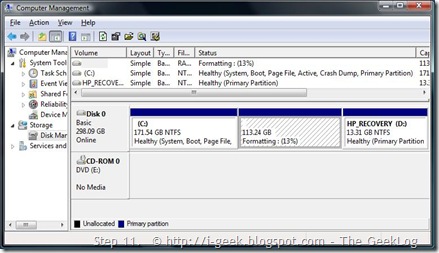
Step 11.

Formatting the new partition (result of shrinking), formatting is your Choice in NTFS (recommended) or FAT32.

vista partition11

Finally, You will have successfully created a new partition out of the freed space.

Hope this will solve your queries. Since the screenshots are real time capture @ our workshop, they are self-explanatory and will assist you a lot.

Please, read the volume III edition of this article : Shrinking a partition by using the CommandLine : Shrinking a Partition in Windows Vista/2008 - Part III

Read Volume I of this article: Shrinking a Partition in Windows Vista/2008 I : Read before you Act

Saturday, July 19, 2008

How to ping a website or an IP address?

Step One

Hold down your [windows key + R] to use the run command shortcut or go to your start menu and click on run if available

Once you use the short cut or use the run button in the start menu the run command will popup.

After you type in "cmd" with out the quotes in the in the command line and click on OK button and the CMD.exe program will open.

command in vista

Step Two

This is the CMD.exe and it can do ms-dos commands and ping website and IP addresses.

Step Three

Once you are in the CMD.exe you need to type in the first line. Type "ping" and a space then type in the website address or an IP address and hit the enter key on your keyboard. Eg:

C:\Users\UserName>ping www.i-geek.blogspot.com

Get the information you desire from the message generated by the command dos.

Program getting better with a genie

A programmer was walking along the beach when he found a lamp. Upon rubbing the lamp a genie appeared who stated "I am the most powerful genie in the world. I can grant you any wish you want, but only one wish."

The programmer pulled out a map of the Mediterranean area and said "I'd like there to be a just and last peace among the people in the middle east."

Genie: "Gee, I don't know. Those people have been fighting since the beginning of time. I can do just about anything, but this is beyond my limits."

Programmer: "Well, I am a programmer and my programs have a lot of users. Please make all the users satisfied with my programs and let them ask sensible changes."

Genie: "Uh, let me see that map again."

Friday, July 18, 2008

Shrinking a Partition in Windows Vista/2008 I : Read before you Act

Back to the memories when managing disk partition on Windows OSes was not that easy game. Tasks related with partition had to be done with 3rd party partition tool as, Partition Magic – probably, one of the most used programs of its kind and others had to be booted externally via bootable CDs of Microsoft’s OSes - Hiren's Boot CD.

You can either re-format, manage partitions or extend, reduce/shrink size of the partition using such tools. But unlike, the previous versions of Windows, Windows Vista and Windows Server 2008 now contain the in-built method for shrinking and extending disk space, thus easing the creation of another new partition. 

Lying in the Disk Management (Computer Management), Shrink feature makes all possibilities that you can go with your hard disk space. Do at your own risk!

Shrinking a partition in Windows Server 2008 is alike to the process in Windows Vista. Screenshots of Windows Vista illustrated here apply equally to Server Manager in Windows Server 2008, except few which you may be familiar with if you’re using Server Edition. The rest of the procedure is the same.

Note: Besides shrinking a volume or partition, in Vista and Windows Server 2008 you can also Extend a partition or volume without the need to reboot or use 3rd-Party tools.

  • Ensure you have Administrative credentials, In Windows Vista, go to Control Panel > System and Maintenance > Administrative Tools, or on the My Computer context menu. Select Computer Management. In Vista, if you are prompted for an administrator password or confirmation, type the password or provide confirmation.
  • In Windows Server 2008 you need to go to Server Manager, found in the Administrative Tools folder or on the My Computer context menu.
  1. Next, scroll down till you get to the Storage section, and in it go to the Disk Management console.
  1. Select the disk you want to shrink, for example Drive C, as in our case.

Note: Shrinking any volume is fine as long as you make sure you leave enough space on the partition you are shrinking. For example, having a 40 GB system partition might seem too much at the beginning, but after a while you might find it to be less than optimal. You see, many applications such as Microsoft Office take tons of free space. So do Service Packs, hotfixes and other files. For a server running Windows Server 2008 this calculation might be different than on a workstation running Windows Vista, but in any case, make a mental note of this BEFORE shrinking your partitions.

Ready to Shrink/Extend the Vista partition, go directly to the complete visual guide to Disk Management- partitioning Windows Vista.

Related Links:

Wednesday, July 16, 2008

Temporary Post Used For Style Detection (5dbd23dc-8b09-44d8-bb14-79dba2795327 - 3bfe001a-32de-4114-a6b4-4005b770f6d7)

This is a temporary post that was not deleted. Please delete this manually. (28d81e60-afbb-467c-acdd-e60ecdd833f7 - 3bfe001a-32de-4114-a6b4-4005b770f6d7)

Friday, July 11, 2008

Managing or resetting Windows Admin Login Password/Key - How to recover Windows' forgotten password?

Windows Key (used here is Windows Key Enterprise Edition from Passware Kit- Password Recovery for Windows Uer Accounts) resets Windows Vista/2003/XP/2000/NT security settings if Administrator password, secure boot password or key disk is lost. This application helps to create a bootable Windows Key CD-ROM or USB Flash Drive. Use CD-ROM or Flash Drive to boot and unlock your PC. You can also create a floppy driver disk.

Windows key enterprise edition
 

You must create a bootable CD image, USB Flash Drive or a driver floppy according to your need. Windows key needs some files from the Windows CD-ROM to create  bootable Windows Key CD-ROM image or similar is the case in casee of USB Flash Disk and Floppy. This program answers you if 'How to recover Windows' forgotten password?' is yours query.

windows key enterprise edition

Windows Key Enterprise Edition works with domain controllers and resets passwords for domain administrators, supports all Service Packs. Windows Key is designed as a tool for administrators, not for "crackers". The product has no bearing on Windows security rating, because it requires physical access to the machine. In any computer system, true security from break-ins is achievable only by isolating the machine from distrusted individuals.

Please follow instructions below to create setup disks:

Windows Key Enterprise Edition is one of the products from Passware Kit. Passware Kit recovers all kinds of passwords for the world's most popular office application files, including Excel, Word, WinZip, Windows XP/2000/NT, Access, Outlook, Quicken, WordPerfect, VBA, 1-2-3, ACT!, Paradox, Organizer, Schedule, WordPro and more.

Below are the steps to recover a password for Microsoft Office document. To recover passwords for other types of files please select different recovery module in the step 1.

To recover a password:

  1. Click the Start button, and then click Program Files, Passware, Office Key
  2. Select the Recover... item in the File menu. A file selection dialog will appear.
  3. Select the file to search password for.
  4. Press the "Open" button to start recovery.

## All Passware products can be ordered worldwide. Online orders are accepted as well as traditional phone, fax, mail/check and corporate purchase orders. Detailed instructions for all kinds of orders are available online at Passware web site: http://www.LostPassword.com

iPhone 3G Now in Japan, London Launch Marred by Software Problem

Amid cheers, queues and smoke, Apple's iPhone made its Japan debut today morning. The launch marks the first time the iPhone has been available in Japan and the chance to be one of the first to own one attracted more than 1,000 people to the store of Japanese carrier Softbank in Tokyo's trendy Harajuku neighborhood by the time sales began at 7a.m.

As the countdown clock reached zero those waiting cheered and special-effects smoke enveloped a crowd of more than 100 journalists and photographers who had turned out to see the launch of the handset.

"This is the year that the cell phone becomes an Internet-connecting machine," said Masayoshi Son, CEO of Softbank, speaking in front of the store just before the launch. "Today is the day that will make it real, and I think it's a historic day."

It took about 20 minutes for the first customer to emerge from the shop clutching his new iPhone. He was actually third in line but had managed to get his application processed the fastest so at first excused himself for beating out the two people who had queued ahead of him. "It's great isn't it," he said. "I've already used it to call my girlfriend." For many prospective buyers the queuing didn't finish at 7a.m. Softbank will begin sales at its other stores and through at electronics retailers from noon on Friday.

Meanwhile, software compatibility problems marred the launch of the iPhone 3G at Apple's flagship store in London, where customers had difficulty activating their new phones.

Apple has an exclusive deal with network operator O2 in the U.K. —but O2's web-based activation system requires the use of Microsoft's Internet Explorer browser to register a new phone: It won't work with the Safari browser bundled in Apple's Mac OS X.

In its Regent Street store, Apple had installed VMware Fusion desktop virtualization software on some of its Macintosh computers, allowing them to run Internet Explorer on Windows, but the activation process was still not working.

"It just goes dead," said would-be customer Mark Phipps, who left the store frustrated and without an iPhone 3G.

"They wouldn't reserve us one, which is a real kick in the teeth," he said.

Phipps is one of at least three customers that left the store disappointed by the delays.

Another, Josh Young, said the activation process was completely broken. He planned to return later.

The short line that had formed outside the store by the time it opened at 8 a.m. quickly moved inside, but two hours later the line had lengthened and extended out onto the street again.
Adapted from http://www.pcworld.in/india/news/Hardware/iPhone_3G_Now_in_Japan,_London_Launch_Marred_by_Software_Problem/5210162/9

iPhone 3G officially our in stores Friday, explore unlimited features of the new 3G iPhone

iPhone 3G.Everybody have been waiting for Apple finally tooking the wraps off its 3G iPhone on Friday July 11th. It's keenly learnt that the new generation of iPhone has thinner edges, full plastic back, flush headphone jack, and the iPhone 2.0 firmware of course! It works with 3rd party applications and best of all is the cheapest of all version ever released, starting price of $199.

iPhone 3G combines three products in one - a revolutionary phone, a widescreen iPod, and a breakthrough Internet device. It features 3G, built-in GPS, and the best email, web browsing, and search ever on a mobile device. With its Multi-Touch interface, iPhone 3G redefines what a mobile phone can do.

Battery life isn't getting put out to pasture though, with 300 hours of standby, 8-10 hours of 2G talk, 5 hours of 3G talk, 7 hours of video and 24 hours of audio. GPS is also a go. Apple is using A-GPS, which supplements regular satellite GPS data with info from cellular towers for faster location. (WiFi data is also worked into the mix, which should give users a pretty solid lock on where the heck they are on this planet.) Unfortunately, as expected there's no front-facing cam, and while its edges are thinner than before it's still about a millimeter thicker at the center (12.3mm over 11.6mm before).

The Final Look of iPhone 3G
Click the image for full picture from Apple.

With tremendous features of the newly arrived 3G iPhone, the plus point is that Apple's thinking to make iPhone 3G available all over the world. Apple hopes to launch in 70 countries this year, with the black 8GB going for $199 and 16GB for $299 in black or white. (Both price points require a contract, of course.) Apple will be hitting the 22 biggest markets, including the US, on July 11th.

Summarized features of iPhone 3G

  • Size: 4.5 by 2.4 by 0.48 inches (115.5 by 62.1 by 12.3 mm), and weighs 4.7 ounces (133 grams).

  • Radios galore: Wi-Fi (802.11b/g), UMTS / HSDPA (850, 1900, 2100MHz), GSM / EDGE (850, 900, 1800, 1900MHz), Bluetooth 2.0 + EDR

  • A SIM ejector comes in the box, would be a paper clip.

  • There's no dock included, just a USB power adapter and dock connector.

  • On AT&T unlimited iPhone 3G data plans for consumers will be available for $30 a month, on top of voice plans starting at $39.99 a month. Unlimited 3G data for business users will be $45 a month, on top of voice. There's a minimum two-year agreement, but we're not positive what that'll look like for those currently enslaved to an AT&T contract -- you could be looking at a solid four years of time if you just took the plunge.

  • Apple's new MobileMe service will be coming with the iPhone 2.0 software, bringing push email and contacts for all.

  • Available on July 11th in: Australia, Austria, Belgium (French), Belgium (Dutch), Canada (English), Canada (French), Denmark, Finland, France, Germany, Hong Kong, Ireland, Italy, Japan, Mexico, Netherlands, New Zealand, Norway, Portugal, Spain, Sweden, Switzerland (French), Switzerland (German), UK, USA

  • The rest of the world is  to get the phone this year: Argentina, Botswana, Brazil, Cameroon, C. African Republic, Chile, Colombia, Croatia, Czech Republic, Dominican Republic, Ecuador, Egypt, El Salvador, Equatorial Guinea, Estonia, Guatemala, Guinea, Guinea-Bissau, Greece, Honduras, Hungary, India, Ivory Coast, Jamaica, Jordan, Kenya, Latvia, Liechtenstein, Lithuania, Macau, Madagascar, Mali, Malta, Mauritius, Nicaragua, Niger, Paraguay, Peru, Philippines, Poland, Romania, Senegal, Singapore, Qatar, Slovakia, South Africa, Turkey, Uruguay.

  • No mention made of MMS, video recording or built-in iChat. What gives, Apple?

# Information and pictures contained in here are from Apple Inc.

Thursday, July 10, 2008

Hitachi Unveils 3.5-inch Drives

Hitachi Global Storage Technologies unveiled a new 3.5-inch hard disk drive family for desktop PCs. The company said the new line includes better data protection capabilities and 43 percent better idle power consumption than the Deskstar 7K1000 line. The new Deskstar 7K1000.B models spin at up to 7,200 rpm and are available in capacities ranging from 160GB to 1TB.

Sweezey noted that Hitachi's second-generation Deskstar 7K1000.B drive line's three-disk configuration improves the density and idle power usage compared to the company's first generation 3.5-inch drive family, which is configured with five disks. A drive is in idle format when the disk is spinning but waiting for a data read/write command to arrive.

By shaving idle energy consumption to 5.2 watts compared to the 8.4 watts used by the Deskstar 7K1000 drives, Sweezey said IT managers can significantly lower the impact and cost of non-active drives on electric bills. "Depending on the application, a drive can spend a good part of day and night in idle mode wasting energy; this was an area we thought was crucial in the [updated] drive design," he remarked.

To enhance data protection of stored files, photos, movies and music, an optional AES-certified bulk data encryption feature has been added to the new device to scramble data. Data is descrambled using a key, Hitachi said.

Hitachi also unveiled the 3.5-inch. Deskstar E7K1000 disk drive line provides low-duty cycle operations for multi-drive server and storage systems, RAID arrays and video surveillance devices. Available in July, the high-end disk drive is priced from $280 (approx Rs. 11,000) at capacities ranging from 500GB to 1TB.

The Deskstar E7K1000 includes an enhanced rotational vibrational sensor to protect against vibration disruptions from other drives and offers 32MB of cache, Hitachi said.

Both the new 3.5-inch Deskstar drive families include a SATA 3Gbit/sec. interface and support hot-swap capability, staggered drive spin-up functionality to ease power usage and Native Command Queuing, said Sweezey.

Subscribe to geeklog feed Bookmark and Share

Design by Free blogger template